MAKING MARKS Exercise 1.3
THE BAG.
 This is my first mark making drawing of ‘The Bag’ I wanted to capture its dumpy, plonked down on the table appearance along with capturing its well loved and worn texture. It was a quick sketch and quite scribbly made with using just a simple graphite 3b pencil onto 160grm white paper.

For the first stage of this drawing I used only items that would make texture, I sketched out a simple outline for a guide and then made marks using Gouache. I used a stamp technique and for the different marks, I used different stamps which I had made, each giving a different texture.The tools used to make the marks are..Lace ribbon, buttons, bent card into a small V shape, bottle top, small coin, edge of a cork plate stand and a sponge.
Once the marks were in place I then added black line using marker pen to give definition.
For the tassel on the bag I used ornamental grass dipped in gouache paint and then pressed this down onto the paper. the pom-pom was achieved by scrunching up cotton threads, dipping them into paint and the little beads were made using the tip of a cotton bud again dipped into paint and pressed down.


EVENING GOWN
Quick fluid, flowing, soft, scratchy, billowing.. strokes of the brush were used to capture the flow and swish of the Evening Gown, the soft floaty silk billowing out from the tight gathers of the waist. I used watercolour paint onto plain sketch paper. For the lurex which is shot through the silk I used small twigs dipped into the paint, I wanted a scratchy feel as the gold lurex is quite harsh and sturdy in comparison to the soft silk.
Diagonal, zig-zag, depth, layers…To produce the feel of the silk showing the lurex design I made jagged zig-zag marks for the outline using a hard graphite 2b pencil onto watercolour paper 360grm I then washed the background with individual strokes of the brush using watercolour paint. For the graphite and paint I tried to keep all of the lines and strokes moving in an individual diagonal line to depict the silk of the gown being cut on the bias.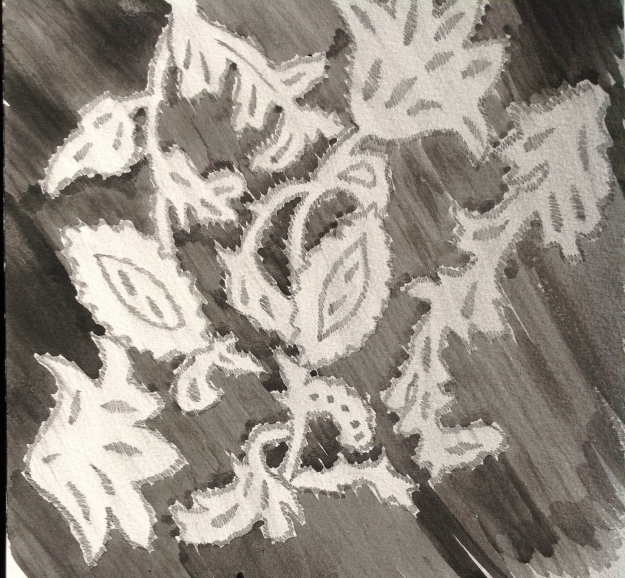
Delicate, scratchy, layered…For the folds of silk I used water colour paint washed onto water colour paper. For the design of the lurex running through the silk I used the back of hazel nut leaves painted with gouache and stamped down over the water colour wash, these are quite rough and scratchy leaves, similar in texture to the lurex itself.
THE KIMONO
Flat, heavy, matt…I used solid blocks of gouache paint to capture the heavy drape and weight of the kimono.
Matt, coarse, shiny, scratchy….Sponged water colour paint onto watercolour paper to show the feel of the matt silk leaving the applique of the flowers without detail showing the contrast between the matt of the base textile and the satin sheen of the applique. 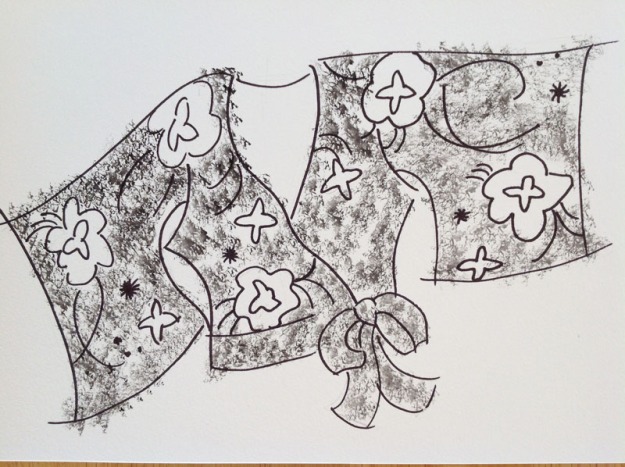
Heavy, chunky, solid, zig-zig.. I drew the outline of the applique using black marker pen. There is nothing delicate about the appearance of the beadwork or the applique on the Kimono. I wanted this to come across in the heavy black zig-zag lines.
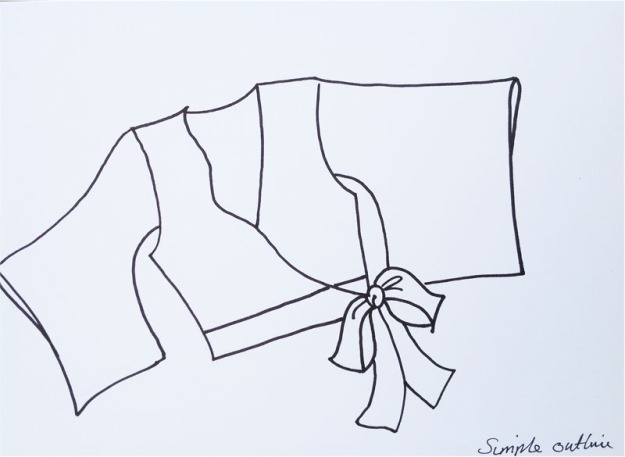
LINES & EDGES Exersise1.4
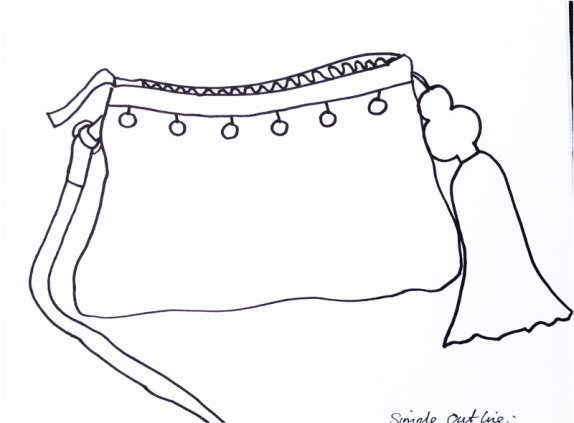
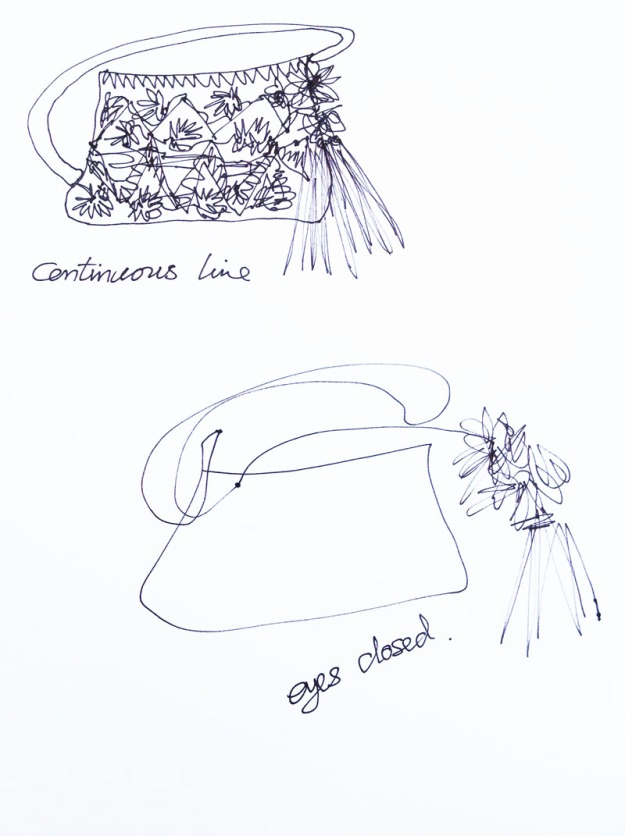
The Bag:

THE DRESS


THE KIMONO


COLLAGE & CREASES Exercise 1.5
I decided I wanted to work my bag for this project, it has so many interesting textures and layers and I was ready to work with some bright vibrant colour!
I made most of my papers digitally by choosing elements of the textile that appealed to me the most, I then enlarged theses and pulled out elements of interest. Because of the digitally enlarged areas I was able to exaggerate the surface of the weave and texture also. I then chose four of the main colours and printed of colour blocks of these.
All these digital papers were then torn and shredded along with other cards and papers I had collected, with a couple of ribbons also added.
A Simple colour block of the overall shape of the bag ,picking out the predominant colours along with gold and silver. I wanted the lines to be solid and diagonal to represent the angles within the surface design of the bag.
This was the fun part, I ripped and shredded as many layers as possible to attempt to achieve a 3 dimensional image to my 2 dimensional collage.
RESEARCH POINT 1
WABI-SABI. Pare down the essence but don’t remove the poetry. ( Koren,2008,p.27)
Research Point 1
“Finding beauty in imperfection, patina, authenticity, harmony and simplicity”.
Wabi, meaning finding simplicity, freshness or quietness within natural or manmade objects or understated elegance.
Sabi, meaning Beauty or serenity, quirks and anomalies which add a unique elegance to an object.
Legend= Sen no Rikyu whilst learning the art of the custom of the ‘Tea way’ was asked by his master to rake and tidy the gardens, once the garden was cleared of all debris he then stood back and scrutinized the perfect ground, before showing his work to his master he shook a cherry tree allowing all the bloom and petals to fall to the floor. To this day the Japanese revere Rikyu for his understanding to his very core of the thread known as Wabi-sabi.
For me Wabi-sabi is about finding beauty in the used imperfections of an object or place and I think maybe even a memory too, and excepting these imperfection have there right to be there. Beauty is not ‘perfection’ but a sense of being in its own right a sense of peace.My home my garden my textiles and just about everything around me has a sense of Wabi-sabi.I was not familiar with this concept before this research project, I now find that it is a concept that has been with me all my life, there is a faded, frayed and weathered appeal that I find all around me. Peeling sun-bleached paint on the shutters of my house, crumbling stone work, rusty iron gates, furniture that I have bought second hand and re painted giving it new life, but still showing the chips and bumps of time. These imperfections are all aspects I except happily, they are “The Charm” the very essence of my love for them.


The natural acceptance of Wabi-Sabi is one that enables me to see the beauty in imperfection and accept that, on this textile journey I will make mistakes whilst mark making, sewing and designing but these mistakes have a place too and may just lead to the creation of something beautiful.
The concept of wabi-Sabi is one that is incredibly relevant with keeping an archive, it helps to tell the history behind the textile through it patina and imperfections, who wore it, how it was cared for, was it loved and neatly folded away in a draw or discarded crumpled at the bottom of a box, the bobbles on a sweater showing how much it was worn, moth holes and cosmetic smudges, deodorant stains and stale perfume are all part of a textiles history.
Reference
http://www.UTNE.com/wabi-sabi the art of imperfection
http://www.wholeliving.com/wabisabiyourlife
http://www.touchingstones.com/learingtoseethe invisible
Leonard Korens book
DETAILS & DEFINITION Exersise 1.6
This small section of beadwork on the evening gown despite its curved shape it is angular and sharp to the touch, I wanted to portray this in the detail by using sharp oblong marks, for the small outer line of glass beads which are smooth to the touch, I used the soft tip of a marker pen.
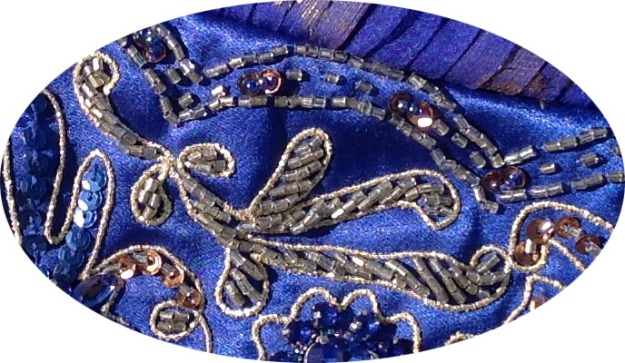

The mirror work on this textile is quite worn and frayed, the stitches are all different, some tight together and some further apart, I used fine marker pen to depict the stitches and used light coloured pencil to try and give the depth and roundness of the raised embroidery.
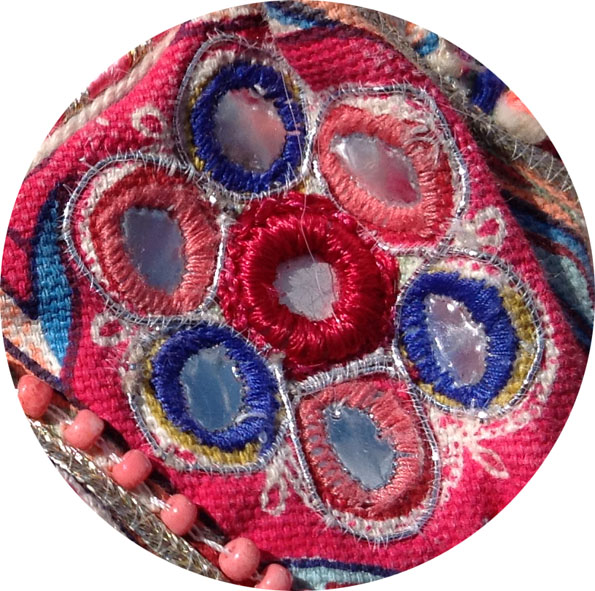

This tiny Starburst of gold lurex I wanted to show enlarged to 8cm the original is only 3cms across. I used acrylic paint as I wanted a chunky feel to the embroidery and I used a cotton bud to achieve this by dipping it into the paint and then laying it length ways to depict the stich work.


